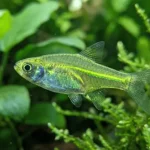
So you want to breed Kubotai rasboras? Good choice. These little green gems (Microdevario kubotai) aren’t as commonly bred as CPDs or Chilis, but they’re actually easier once you know what triggers them.
Here’s the short version: soft acidic water (pH 6.0-6.5), groups of 5-6 fish instead of pairs, dense Java moss, a splash of methylene blue for eggs, and aged driftwood for fry. That last one? That’s the hidden gem most guides skip entirely. Mike Hellweg from TFH Magazine, who’s been breeding tiny cyprinids for 20+ years, found that fry need the slimy biofilm coating on aged wood and leaves to survive their first weeks. Without it, fry die even when you’re feeding them perfectly.
Let’s break this down.
Where These Fish Come From (And Why It Matters)
Understanding their wild habitat tells you exactly what conditions to recreate. Kubotai come from clear, well-oxygenated headwater streams in Thailand’s Ranong and Phang Nga provinces, plus Myanmar’s Ataran River basin. Their habitats feature substrates of sand, gravel, and rocks with aquatic plants like Cryptocoryne crispatula and Pogostemon helferi.
These aren’t blackwater fish like Boraras. They come from clearer water. But they still need soft, slightly acidic conditions to spawn reliably.
Kubotai are continuous egg scatterers with no parental care. Females drop eggs among fine-leaved plants, males fertilize externally, and both parents will happily eat the eggs if given the chance. Spawning typically happens in small batches, often at first light. A well-conditioned group can spawn daily when conditions are right.
Water Chemistry: The Make-or-Break Factor
Here’s something I see constantly on forums: people keep Kubotai alive for years in harder water, then wonder why they won’t breed. Water chemistry isn’t optional for breeding. It’s everything.
For general keeping, you want pH around 6.0-7.0, temperature 20-26°C (68-79°F), and hardness 18-179 ppm. But those are the acceptable ranges. For actual spawning success, you need to push toward the softer, more acidic end.
One UKAPS breeder shared a telling experience. He observed spawning behavior immediately after switching from Seiryu stone (which raises hardness) to lava rock. Getting the water below 2 KH triggered spawning activity.
If your tap water runs above pH 7.5 or your GH is above 8 degrees, you’ll need to cut it with RO water or filter through peat. Target pH 6.0-6.5, GH 2-4 dGH, and KH below 2 dKH for best results.
Here’s a quirk about temperature: keep it in the mid-range (24°C / 75°F) during incubation. Higher temperatures speed up egg development but also accelerate fungus growth. I’ve seen multiple breeders report losing entire batches to fungus when they tried bumping temps to “speed things up.”
Tank Setup For Controlled Spawning
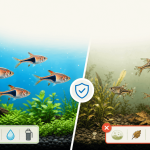
You don’t need anything fancy. A 10-15 liter container (3-4 gallons) works well for controlled spawns. Some breeders use those “dip and pour” containers from fish stores with moss on the bottom and a gentle airstone. Others prefer bare-bottom tanks with a mesh layer that lets eggs fall through, protecting them from predation.
The mesh bottom technique is simple: keep fish in a tank with a false bottom made from mesh material, eggs scatter and fall through to the bottom where adults can’t reach them. Clean bare-bottom makes eggs easy to spot.
Fill at least half the available space with fine spawning media. Java moss works best. It catches scattered eggs, harbors natural infusoria for fry, and gives adults somewhere to direct their spawning behavior. Spawning mops made of acrylic wool work as alternatives, but moss has that added benefit of culturing fry food.
One thing many guides miss: these fish evolved in flowing water and need some current to stay active and breed properly. A small airstone or powerhead improves breeding behavior noticeably. Stagnant water makes them sluggish.
Keep water depth shallow, around 10-15 cm (4-6 inches). You don’t need strong lighting for the breeding container itself.
Conditioning Your Fish
You can’t just throw fish in a container and expect magic. Conditioning makes the difference between females full of eggs and females that never get there.
Feed a varied diet including dried foods of a suitable size, plus small live and frozen varieties like Daphnia, Artemia, and bloodworm. Live foods make the biggest difference. Freshly hatched brine shrimp (BBS) fed twice daily, daphnia for movement and hunting stimulation, cyclops for variety, microworms and grindal worms for protein loading.
How long? Two to four weeks of heavy feeding before you attempt spawning. You’ll know females are ready when their bellies look noticeably rounded, especially when viewed from above.
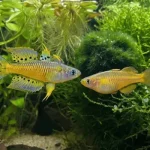
Both sexes turn darker, almost golden when excited and entering breeding condition. Males start showing off with more intense green-yellow coloration and actively chasing females.
Here’s a success story from Planted Tank Forum. A breeder spotted a gravid female, placed one female with two males in a container with moss, changed 50% water daily, and fed freshly hatched BBS twice daily. Eggs appeared on day 4, a ton of eggs according to the breeder.
Sexing: Tricky But Doable
Let’s be honest. Sexually mature females grow slightly larger and heavier-bodied than males, especially when gravid. That’s the main difference.
Males tend to be slimmer with more intense coloration. Females look deeper-bodied and larger overall, with slightly more muted colors. When females carry eggs, you can see the rounded belly from above.
Forum breeders consistently admit they find Kubotai really hard to sex. The solution? Keep groups and let the fish sort themselves out during courtship rather than trying to pick specific pairs.
Groups Beat Pairs
This might be the single most overlooked tip. Groups of 5-6 fish spawn more reliably than pairs or trios because Kubotai stress easily when isolated in small numbers.
One UKAPS breeder reported that a trio setup was too stressful for the fish, while keeping groups reduced individual stress and produced consistent spawning.
The tradeoff? More fish means higher egg predation risk. That’s why you need dense spawning media. But the increased spawning activity more than compensates.
What Spawning Looks Like
How do you know it’s happening?
Courtship displays involve males swimming side-by-side with females and shimmering against each other’s flanks. This is different from the head-to-head sparring you’ll see when males establish dominance. Side-by-side shimmying means business.
Females scatter eggs among fine-leaved vegetation while males fertilize externally. Eggs are tiny and stick to plant roots or sink if no plants are present.
Once you spot spawning activity, remove adults within 48-72 hours. They will eat eggs and fry without hesitation.
Protecting The Eggs
Eggs hatch in roughly 72 hours at 24°C. During this window, fungus is your enemy.
Add 2-3 drops of methylene blue when setting up the breeding container. This prevents fungal growth without harming eggs. Keep temperature steady around 24°C, not higher. Remove any white or fuzzy eggs immediately before fungus spreads to healthy ones.
Fry absorb their yolk sac over the first few days, becoming free-swimming around day 6-7 post-spawn.
Fry Food: The Critical First Two Weeks
Here’s where most breeding attempts fail. Kubotai fry are absurdly small. Fry need microscopic first foods in the 5-50 micron range.
Your options: infusoria (paramecium), vinegar eels, green water (microalgae), or commercial powdered fry foods like Hikari First Bites. To culture infusoria, fill a jar with aged aquarium water, add a piece of Java moss as a natural source, then add blanched lettuce or banana peel. Place it in a sunny location and wait 3-7 days until the water clouds with bacteria then clears as infusoria consume them.
Start your culture before spawning so food is ready when fry hatch. This isn’t optional.
But here’s the hidden gem that explains why some breeders succeed while others watch fry die despite perfect feeding schedules. Research on breeding tiny Boraras species revealed that fry require the slimy biofilm coating that develops on aged driftwood and decaying leaves, not just infusoria. This biofilm contains bacteria, fungi, and microscopic life that fry graze on constantly between feedings.
Fry tanks should include aged driftwood and Indian almond leaves from the start. Transfer these from established tanks so they’re already coated with biofilm. Without this, fry may starve even when you’re doing everything else right.
After 2-3 weeks, fry become large enough to accept baby brine shrimp. That’s when growth accelerates. One UKAPS breeder raised 37+ fry that reached near-adult size in just 6.5 weeks using this progression.
Water Changes During Fry Raising
This trips people up constantly. Fry are incredibly sensitive and can die after a routine water change.
For the first two weeks, don’t do traditional water changes. Top off evaporation with aged water from the parent tank instead. Same parameters, same temperature. When you do start changes, keep them small and frequent rather than large and occasional. Use airline tubing to drip new water in slowly. Match temperature exactly.
That successful UKAPS breeder did daily small water changes (2-4 liters) after the first two weeks, starting with 50/50 tap and RO water, then slowly raised TDS from around 50 to 85% tap over several weeks.
The Environmental Triggers Nobody Talks About
Want to push your odds even higher? Here are some subtle triggers breeders have noticed.
One Planted Tank member reported that adding an extra powerhead made their rasboras school tighter with more energy and enthusiasm. Water flow mimics their natural stream habitat and seems to stimulate breeding behavior.
Large water changes with soft, slightly cooler water can simulate monsoon conditions. Some breeders time spawning attempts to coincide with barometric pressure drops before storms. Whether this actually matters is debatable, but it costs nothing to try.
Related species like Boraras tend to spawn just after first light. Dawn simulation with gradual lighting increases might help trigger spawning activity.
When Things Go Wrong
Eggs fungus over: Temperature too high, water quality poor, or no methylene blue. Lower temp to 24°C, add methylene blue at setup, use clean containers.
No eggs at all: Fish stressed or water too hard. Use groups of 5-6 instead of pairs, get that water soft and acidic.
Fry die after hatching: No appropriate first food or missing biofilm sources. Culture infusoria before spawning, add aged driftwood and leaves.
Fry die at water changes: Parameter shock. Use aged parent tank water, match temperature exactly, drip slowly.
Adults eating all eggs: Not enough spawning media. Fill 50%+ of tank with Java moss or use a mesh bottom.
Your Timeline
Four weeks before spawning: Start conditioning your group with live foods twice daily.
One week before: Start infusoria culture.
Three days before: Set up breeding container with aged water, dense Java moss, gentle airstone, driftwood, and methylene blue.
Day zero: Introduce 5-6 conditioned fish with a mix of gravid females and colorful males.
Days 1-2: Feed BBS twice daily, do 50% water change with aged water.
Days 3-4: Watch for golden coloration and side-by-side behavior. Spawning usually happens around now.
Day 3-4: Remove all adults once you’ve seen spawning.
Day 6-7: Eggs hatch (roughly 72 hours post-spawn). Fry become free-swimming.
Days 7-21: Feed infusoria 3-5 times daily, transition gradually to larger foods.
Day 21+: Introduce baby brine shrimp when fry can handle it.
Week 6-7: Fish approach adult size. First generation may start breeding themselves around week 8-10.
The Bottom Line
Kubotai breeding isn’t complicated once you understand what actually matters. Soft water below pH 6.5. Groups instead of pairs. Dense spawning media. Methylene blue for eggs. And most importantly, that biofilm on aged wood and leaves that fry need to survive.
Get those elements right and you’ll have more fry than you know what to do with. Breeders report raising 30-40+ fry per successful spawn with fish reaching tradeable size in under two months.
The biggest obstacle isn’t getting them to spawn. It’s keeping those microscopic fry alive through their first critical weeks. Have your infusoria ready, your biofilm sources in place, and resist the urge to mess with water parameters once fry are swimming.
Good luck. These fish are worth the effort.